

Best Lighting for Original Oil Paintings: A 2026 Guide
Oct 11, 2026
Table of Contents
- Why Lighting Matters for Original Oil Paintings
- Natural Light for Oil Paintings: Opportunities and Risks
- Choosing Between Artificial and Daylight Sources
- How to Avoid Glare on Oil Paintings
- LED Picture Lights for Paintings: Specifications and Setup
- Step-by-Step: Setting Up Lighting for Your Oil Painting
- Room-Specific Lighting: Home Display, Studio Work, and Photography
- Common Mistakes to Avoid
- Frequently Asked Questions
Last Updated: October 10, 2026
Why Lighting Matters for Original Oil Paintings
Proper lighting for original oil paintings reveals what the artist intended. Oil paint has depth, texture, and reflective qualities that change dramatically with light angle. Without the right approach, even a masterpiece can look flat, dull, or distorted.

Lighting original oil paintings directly affects how collectors experience brushwork, color nuance, and dimensional quality. Poor lighting washes out colors, creates harsh shadows, or causes glare that obscures the surface.
Incorrect lighting darkens paintings or shifts colors toward yellow or orange. Overly bright light bleaches colors and damages paint over time. This guide covers techniques to display oil paintings beautifully while protecting them.
Natural Light for Oil Paintings: Opportunities and Risks
Natural daylight offers advantages: full spectrum color and revealed brushwork depth. Many collectors position paintings to receive soft, indirect daylight during certain hours.
Direct sunlight poses serious risks: heat cracks paint and yellows varnish; ultraviolet radiation fades colors and weakens pigments.
Controlling UV exposure and heat
UV exposure degrades oil paint even in indirect daylight. Use UV-blocking window film or UV-filtering glass in frames or display cases to block harmful wavelengths while allowing visible light through.
Heat fluctuations cause physical stress: repeated expansion and contraction create micro-cracks. Keep paintings away from direct sun exposure; position them where they receive reflected or diffused daylight only.
Choosing Between Artificial and Daylight Sources
Artificial lighting offers control: adjustable color temperature and brightness, no UV, minimal heat, and works in rooms without windows.
Choose artificial light for rooms without windows or uncontrolled natural light. Combine both sources if soft, indirect daylight is available part-time.
Daylight-balanced LED lights simulate natural light without UV radiation or heat, offering visual quality without risks.
How to Avoid Glare on Oil Paintings
Glare occurs when light reflects off the painting's surface into your eyes, obscuring the image and brushwork. It indicates light is hitting at the wrong angle.
Understanding surface sheen and impasto texture
Oil paintings have varying finishes: glossy varnish, matte, or none. Textured paintings with visible brushstrokes and impasto present special challenges.

Impasto texture catches light unevenly. Head-on light creates bright spots and shadows that distort the image. This is especially problematic for paintings with dynamic brushwork and layered paint that demands careful lighting to showcase its full character.
Surface sheen determines reflection: glossy varnish reflects most, matte less, unvarnished least. Knowing your painting's finish predicts its response to light angles.
The 30-degree angle principle
The most effective way to avoid glare is to position your light source at a specific angle. The 30-degree angle principle is the standard used by museums and professional galleries. Light should strike the painting at approximately 30 degrees from the vertical plane.
Tilt your light source 30 degrees away from vertical so the beam hits at an angle rather than straight-on. This minimizes reflections bouncing back to the viewer's eye.
At 30 degrees, light penetrates the paint layer, reveals texture and depth, and eliminates glare by bouncing light away from the viewer.
Position your light fixture above and in front of the painting, roughly 3-4 feet above its top edge and angled downward. Adjust until no bright reflection appears from different viewing positions.
LED Picture Lights for Paintings: Specifications and Setup
LED picture lights are the modern standard: minimal heat, low electricity use, long lifespan, and available in various color temperatures.
Color temperature and CRI for accurate color rendering
Two specifications matter when choosing an LED picture light: color temperature (measured in Kelvin) and CRI (Color Rendering Index).
Color temperature determines light warmth: warm (2700K-3000K) adds yellow/orange, neutral (4000K-4500K) approximates daylight, cool (5000K-6500K) adds blue. For oil paintings, use neutral to warm (3000K-4000K) to reveal true colors.
CRI measures color accuracy. CRI 90+ reveals true colors; below 80 distorts them. Always choose CRI 90+ for original paintings to match natural daylight colors.
Brightness and light intensity requirements
Most original oil paintings look best with 200-500 lux of illumination on the painting surface, bright enough to reveal detail and color without glare or appearing unnaturally bright.
Small paintings (under 24 inches) 2-3 feet from the light need 200-300 lumens; large paintings (over 48 inches) need 500-800 lumens. Many LED picture lights offer adjustable brightness.
A practical approach: start with a 300-500 lumen LED picture light. If the painting looks too dark, increase brightness. If it looks washed out or creates glare, reduce brightness or adjust the angle.
| Light Specification | Recommended Range | Why It Matters |
|---|---|---|
| Color Temperature | 3000K-4000K | Reveals true colors without adding warmth or coolness |
| CRI | 90+ | Ensures accurate color rendering |
| Brightness | 200-500 lux on surface | Reveals detail without glare or damage |
| Angle | 30 degrees from vertical | Minimizes glare and reflections |
Step-by-Step: Setting Up Lighting for Your Oil Painting
Follow this process to evaluate and set up lighting for your painting. This method works whether you're displaying a new acquisition or improving lighting for a painting already on your wall.
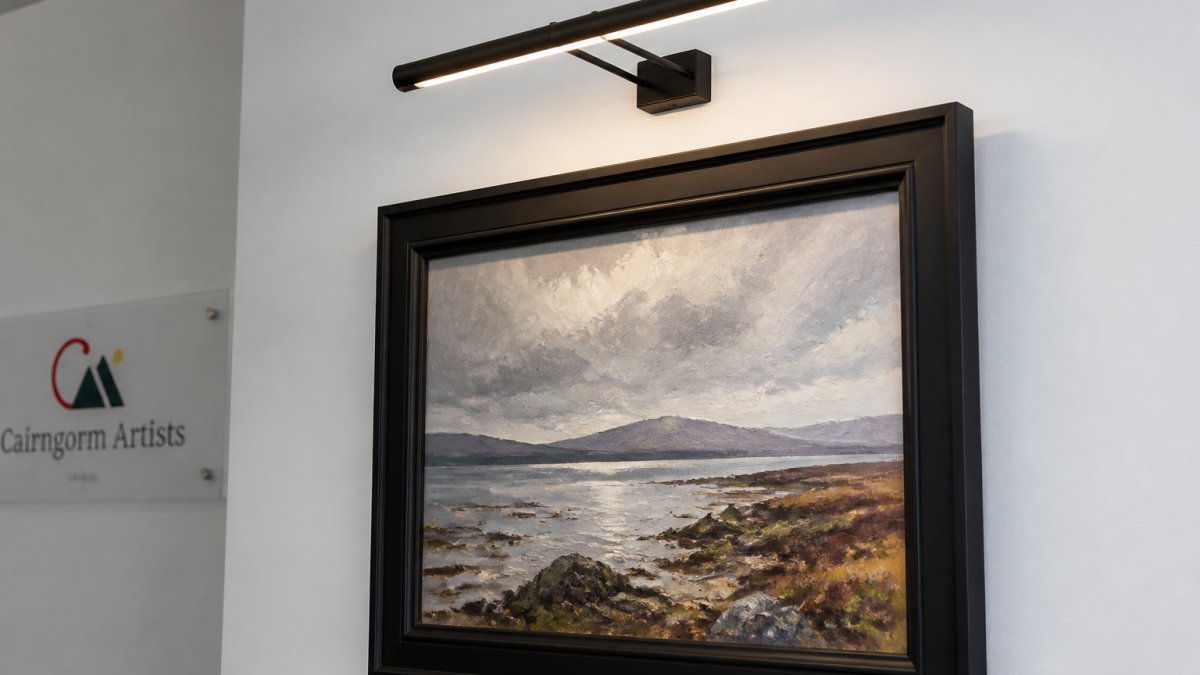
Positioning fixtures and aiming light
Step 1: Choose your fixture location. Decide whether your light will come from above the painting, to the side, or from a combination of angles. Most single-source lighting comes from above. Position the fixture 2-4 feet above the painting's top edge, depending on the painting's size and the room's height.
Step 2: Set the angle. Tilt the light fixture so it strikes the painting at approximately 30 degrees from vertical. Use a simple angle finder or estimate by eye. The light should not shine directly down on the painting but rather at an angle away from the viewer.
Loch Morlich Chill . Fine art print from original oil painting →
Step 3: Turn on the light and observe. Stand in front of the painting and look for glare. Move to different positions in the room. If you see a bright reflection on the painting's surface, the angle is too steep. Adjust the fixture to a shallower angle.
Step 4: Check color accuracy. Compare the painting's colors under your new lighting to how they appear in daylight (if possible). The colors should match closely. If the light adds unwanted warmth or coolness, switch to a different color temperature.
Step 5: Evaluate brightness. The painting should be clearly visible and detailed, but not so bright that it appears washed out. If the painting looks dark, increase brightness. If it looks flat or overly bright, reduce brightness.
Achieving even illumination across the surface
Uneven lighting is a common problem. One side of the painting looks brighter than the other. Corners appear darker. This happens when a single light source is too close or positioned off-center.
To achieve even illumination, follow these principles:
-
Distance matters. The farther the light is from the painting, the more even the illumination. If you have a bright light very close to the painting, the near side will be brighter than the far side. Move the light farther away and increase brightness to compensate.
-
Angle symmetry helps. If the light comes from above and slightly to one side, position it so it's equidistant from the painting's edges. Avoid positioning the light directly above one corner.
-
Multiple lights balance brightness. For large paintings, using two smaller lights positioned symmetrically (one above-left, one above-right) creates more even illumination than a single bright light.
-
Test with your eyes. Stand back and observe the painting from several positions. The brightness should appear consistent across the entire surface. If one area looks noticeably darker, adjust the fixture position or angle.
A practical test: photograph the painting under your lighting setup. Look at the photo on your phone or computer. Uneven areas are often more obvious in photos than to the naked eye. If the photo shows bright spots or dark zones, adjust the lighting until the photo shows consistent brightness.
Room-Specific Lighting: Home Display, Studio Work, and Photography
Different settings require different approaches to lighting original oil paintings. A painting in your living room has different needs than one in an artist's studio or one being photographed for documentation.
Home display prioritizes visual appeal and long-term preservation. Use soft, warm-toned LED picture lights positioned at a 30-degree angle. Avoid direct sunlight. If the painting is in a room with windows, use UV-filtering window film. Consider the painting's color palette when choosing light color temperature.
Studio work requires bright, even illumination for painting and evaluation. Artists need to see colors accurately while working. Use daylight-balanced LED panels (5000K-5500K CRI 95+) positioned above and to the side of the easel. Brightness should be 500-1000 lux on the painting surface.
Photography demands precise lighting to capture the painting accurately. Use two lights positioned symmetrically at 45-degree angles to the painting's surface. This creates gentle modeling without harsh shadows. Ensure the lights are the same brightness and color temperature. Use a gray card to white-balance your camera.
For collectors displaying works from Cairngorm Artists or similar original paintings, home display lighting is the priority. The goal is to reveal the artist's brushwork and color choices while protecting the painting from damage. A single warm-toned LED picture light positioned above the painting at a 30-degree angle accomplishes both.
Common Mistakes to Avoid
Understanding what not to do is as important as knowing the right approach. These mistakes are easy to make but damage paintings or obscure their beauty.
Positioning light directly above the painting. This creates harsh shadows in texture and glare on glossy surfaces. Always angle the light away from vertical.
Using overly bright lights. Brightness above 800 lux can damage paint and varnish over time. It also washes out colors and creates an unnatural appearance.
Mixing warm and cool lights. If you use multiple light sources, they should have the same color temperature.
Placing paintings in direct sunlight. Even a few hours per day of direct sun causes fading and damage. Indirect daylight is acceptable if supplemented with UV filtering.
Forgetting about heat. Some older halogen or incandescent lights generate significant heat. Never use these for original paintings. Stick with LEDs, which produce minimal heat.
Ignoring the painting's surface finish. A glossy varnished painting needs different angle and positioning than a matte finish. Understand your painting's characteristics before setting up lighting.
Using lights with low CRI. Budget LED lights often have CRI below 80. They distort colors and make your painting look worse than it actually is.
Displaying an original oil painting beautifully requires attention to detail, but the process is straightforward once you understand the principles.
Frequently Asked Questions
What's the best angle for positioning a light above an oil painting?
Position your light source at approximately 30 degrees from the vertical plane of the painting. This angle minimizes glare and reflections while ensuring even illumination across the surface. For paintings with significant impasto texture or glossy varnish, test the angle by viewing the painting from different positions in the room, you should see color and detail without bright spots bouncing back at you.
Are LED picture lights safe for original oil paintings?
Yes, LED picture lights are generally safe for original oil paintings when properly selected. Choose LEDs with a color temperature between 3000K and 4000K and a CRI (color rendering index) of at least 90 to preserve accurate color. LEDs produce minimal heat and no UV radiation, making them ideal for conservation. Ensure the light is positioned to avoid glare and that brightness is sufficient, typically 300-500 lux is appropriate for viewing without causing damage.
How do I light an oil painting without glare?
Glare on oil paintings occurs when light reflects directly off the surface, especially on textured or varnished areas. To avoid it: position your light at a 30-degree angle rather than straight on, use diffused or soft light sources, choose matte-finish frames when possible, and avoid placing the light directly above the painting's center. Test your setup by standing in front of the painting and looking for bright spots; adjust the fixture angle until the surface appears evenly lit without reflections.
Is natural light safe for displaying an oil painting?
Natural light can display oil paintings beautifully but carries conservation risks. Sunlight contains UV radiation and heat that can fade colors, crack varnish, and damage the paint over time. If using natural light, filter it through UV-protective window film or sheer curtains, avoid direct sunlight, and rotate the painting's position periodically to prevent uneven fading. For permanent display, artificial lighting with UV protection offers better control and long-term safety for your original artwork.


