

How to Hang Large Coastal Paintings: A Step-by-Step Guide
Sep 28, 2026
Table of Contents
- Planning Your Coastal Painting Display
- Ideal Height for Hanging Large Paintings
- Best Hardware for Heavy Wall Art
- Measuring, Marking, and Installation
- How to Arrange Coastal Wall Art Sets
- Common Mistakes to Avoid
- Finishing Touches: Lighting and Negative Space
- Frequently Asked Questions
Last Updated: September 27, 2026
Planning Your Coastal Painting Display
When you hang large coastal paintings, thoughtful planning is essential. It's about creating a focal point that anchors a room, and at Cairngorm Artists, we understand the technical and design considerations involved.
Assess your wall and lighting. Coastal art thrives with good light, especially pieces featuring lighthouses, cliffs, and water. Windows that don't create harsh glare on the canvas work best.
Consider your furniture layout. A large painting works best when it relates visually to surrounding pieces, anchoring a sofa wall, or using furniture width as a reference point for centering.
Assessing your wall space and lighting
Your wall must support both physical and visual weight. Use a stud finder to locate studs, your strongest anchor points for heavier pieces.
Lighting matters greatly. Soft, indirect light brings out subtle color transitions in coastal paintings. Avoid placing art directly opposite bright windows, which creates harsh backlighting.
Wall color affects impact, pale pieces disappear on white walls, while darker walls make paintings pop. Digital visualization tools let you preview placement before hanging.
Choosing your focal point
Every room has a natural focal point, a fireplace, window view, or entry wall. Your coastal painting should either become the focal point or complement an existing one.
If the wall has architectural features like a fireplace or shelving, position the painting above or beside them for visual balance. A lighthouse painting above a fireplace creates symmetry; on an empty wall it may feel unanchored.
Place your coastal art where the eye naturally travels upon entering, noticed and appreciated without competing for attention.
Ideal Height for Hanging Large Paintings
The 57-inch rule is the art world standard: measure 57 inches from the floor to the center of your painting, where most people's eyes naturally rest when standing.
Adjust for non-standard ceilings: lower ceilings may require 54-56 inches; higher ceilings can accommodate 60 inches or more.
The 57-inch eye-level rule
Eye-level hanging creates immediate visual connection and feels natural and welcoming.
To apply: measure 57 inches from the floor and mark this point. Hang the painting so its center aligns with the mark. For a 30-inch tall painting, the top reaches 72 inches; for a 40-inch piece, 77 inches.
Adjusting for furniture and room layout
Above a sofa, aim for 60-66 inches to the center to account for seated viewers, where eye level drops.
Above a console table or dresser, hang at 60-65 inches to the center for visual breathing room.
In rooms with lower ceilings (8 feet or less), lower the center to 54-56 inches. In vaulted ceilings, go up to 60 inches without the piece feeling lost.
Maintain 8-12 inches between the top of a sofa and the painting's bottom for intentional, balanced spacing.
Best Hardware for Heavy Wall Art
Large coastal paintings demand serious hardware. While Cairngorm Artists canvas prints arrive with sturdy frames, your wall anchors determine whether the art stays secure.
Weight matters first. Large canvas prints weigh 15-25 pounds; standard drywall anchors fail under this load. Use hardware rated for your piece's actual weight.
Selecting mounting hardware by wall type
Studs are your first choice. Use a heavy-duty picture hook or lag bolt directly into the stud, the safest option for pieces over 20 pounds.
If studs don't align, use heavy-duty drywall anchors. Toggle bolts support 25-50 pounds; molly bolts support 15-25 pounds. Check packaging for exact ratings.
For plaster walls, use special plaster anchors that spread load across a wider area, preventing cracks in brittle plaster.
Never use nails for large paintings, they slip out over time. Screws with appropriate anchors are non-negotiable.
Understanding weight capacity and safety
Use hardware rated for at least 1.5 times the painting's weight. For a 20-pound piece, use hardware rated for 30 pounds minimum to account for wall imperfections and stress.
D-rings and wire systems distribute weight across two points. D-rings attach to the frame back and connect to wire stretched between two wall anchors.
Ardnamurchan Lighthouse View - canvas →
French cleats, two angled wood pieces, one on the wall and one on the frame, handle very heavy pieces and allow easy removal without wall damage.
Test your installation by gently pulling down on the painting. If it moves or flexes, tighten anchors or switch to heavier-duty hardware.
Measuring, Marking, and Installation
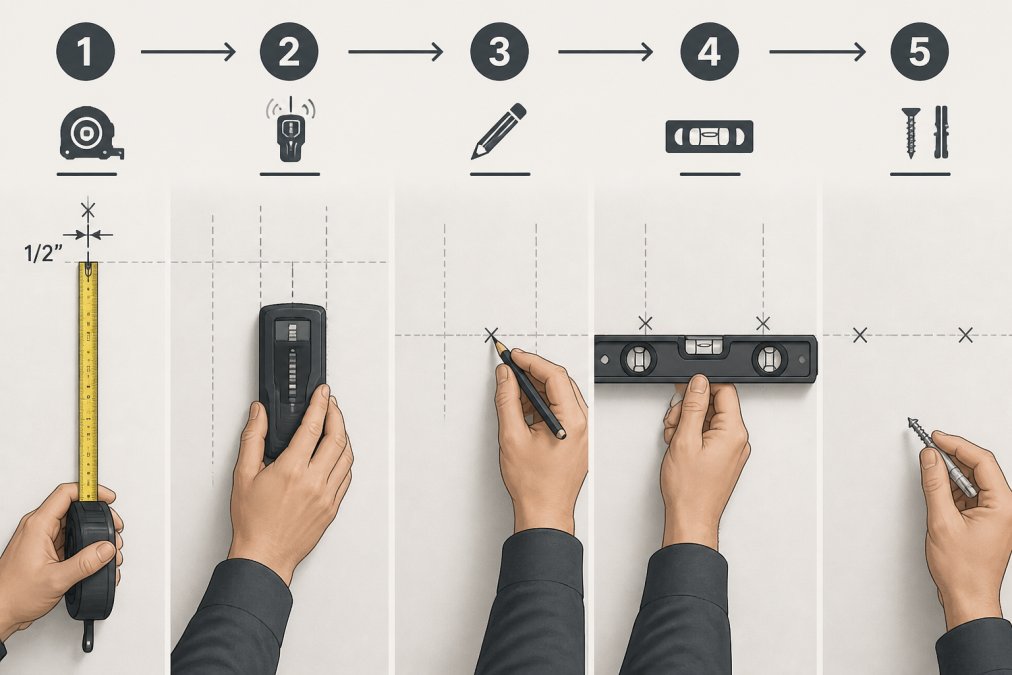
Gather tools: a level, stud finder, measuring tape, pencil, painter's tape, and a drill with matching bits.
Start by finding studs. Use your stud finder to locate them. Mark stud locations lightly with pencil. Studs run vertically and are typically 16 inches apart.
Measure your painting's height and width. On painter's tape, mark where the top and bottom of the frame will sit. Use the painter's tape as a template on the wall. This lets you visualize the placement before making permanent marks.
Tools and preparation
A level is essential. Paintings that tilt even slightly look wrong and distract viewers. A 2-foot level works well for most installations.
Your stud finder should be a basic electronic model. Press it against the wall and slide horizontally until it indicates a stud. Mark both edges of the stud with light pencil marks.
A measuring tape helps you maintain consistent spacing. If you're hanging multiple pieces, measure the distance between them carefully. Consistency creates visual harmony.
Painter's tape is your friend. Apply it to the wall in the outline of your painting. Step back and look at the composition. Does it feel balanced? Does it relate properly to furniture and other elements? Make adjustments now, before drilling.
Step-by-step hanging process
Step 1: Mark the center line. Measure the width of your painting. Find the midpoint. On your painter's tape outline, draw a vertical line down the center. This ensures perfect horizontal alignment.
Step 2: Mark the hanging height. Measure 57 inches from the floor (or your adjusted height). Mark this point on the wall. This is where the center of your painting will sit.
Step 3: Determine anchor placement. If using two D-rings and wire, mark points 2-3 inches from the top of the frame, on either side of center. If using a single anchor, mark the center point where your wire or hanging hardware will attach.
Step 4: Install anchors. If using studs, drill pilot holes directly into the stud at your marked points. If using drywall anchors, follow the anchor manufacturer's instructions. Insert the anchor and screw in the hook or bolt.
Step 5: Hang the painting. Attach wire or D-rings to the back of the frame if not already done. Lift the painting and hang it on the wall anchors. Adjust until level.
Step 6: Check alignment. Use your level to confirm the frame is perfectly horizontal. Adjust the wire length or anchor position if needed. A tilted painting ruins the visual impact.
How to Arrange Coastal Wall Art Sets
Many collectors display multiple coastal paintings together. This creates a gallery wall effect and showcases different perspectives of the same landscape or complementary scenes.
Spacing between panels matters enormously. Too close, and the pieces feel cramped. Too far apart, and they lose their connection. A common approach is 2-3 inches between frames.
Spacing and composition for multi-panel arrangements
For a triptych (three panels), arrange them horizontally with equal spacing. The center panel often features the strongest focal point, with supporting images on either side. A three-panel lighthouse set might show the lighthouse in the center, with coastal cliffs on the left and calm water on the right.
Symmetry, asymmetry, and visual balance
Symmetrical arrangements feel stable and traditional. Two identical paintings flanking a larger central piece create mirror-image balance. This works beautifully for pairs of lighthouse paintings from Cairngorm Artists.
Common Mistakes to Avoid
Hanging too high is the most frequent error. Paintings mounted with their center above 60 inches feel disconnected from the room. They become wall decoration rather than focal points.
Finishing Touches: Lighting and Negative Space
Once you hang large coastal paintings level and secure, lighting becomes your next focus. Proper illumination transforms the piece.
Frequently Asked Questions
What is the 57-inch rule for hanging large coastal paintings?
The 57-inch rule is a design standard where the center of your painting hangs at approximately 57 inches (145 cm) from the floor to the center of the artwork. This eye-level placement creates a natural focal point in most rooms. For large coastal paintings, this height works well in living rooms and hallways, though you may adjust slightly based on furniture placement and ceiling height. Always measure from the floor to where your painting's center will sit before marking the wall.
What is the best hardware for hanging heavy coastal canvas art?
For large coastal canvas paintings, use D-rings or wire hanging systems paired with heavy-duty wall anchors or studs. If your wall is drywall without studs nearby, use toggle bolts or heavy-duty anchors rated for at least twice your painting's weight. For plaster or older walls, locate studs with a stud finder and use lag bolts. Ensure your hardware is rated accordingly. Always test the installation with the painting still in hand before fully releasing it.
How do I arrange multiple coastal paintings together on one wall?
Start by laying all pieces on the floor to plan your arrangement. Maintain consistent spacing of 5-8 cm between frames for a gallery wall effect. For asymmetrical layouts, balance larger pieces with smaller ones to create visual harmony. Measure the total width and height of your arrangement, find the center point, and mark that on the wall first. Then work outward from the center, ensuring horizontal and vertical alignment. Coastal art sets benefit from a mix of portrait and landscape orientations to enhance the natural, flowing aesthetic of seascapes.
How do I know if my wall can support a large coastal painting?
Check your wall type first: drywall, plaster, brick, or concrete each require different hardware. Use a stud finder to locate wooden studs behind drywall, which provide the strongest anchor points. For paintings heavier than 5 kg, always mount into studs or use heavy-duty anchors rated for the weight. If you're unsure about your wall's condition, particularly in older homes, inspect for cracks or soft spots. When you receive your Cairngorm Artists canvas print, match its weight to your hardware specifications before installation.


